KNOWLEDGEBASE

We pride ourselves on bringing a fresh perspective and effective insight knowledge of each technology.

  • Spring Portlet In Liferay 7 DXP

    Spring Portlet In Liferay 7 DXP

    Spring Portlet In Liferay 7 DXP

    Creating Spring Portlet was a nightmare In Liferay 7 DXP, in the Latest version of the Liferay IDE it has been made so simple to create a Spring Portlet Using Liferay IDE

    Environment
    Liferay IDE 3.1.1 GA2
    Liferay CE Portal Tomcat 7 GA4
    JDK 8
    MySql 5.7

    Step 1: Create A Module Project

    Select "spring-mvc-portlet" project Template.


    Click Next

    Step 2 : Portlet Class Name and  Package Name


    Click Finish, Then You can see the project directory structure as shown below.


    Congrats, You have just created a Spring Portlet in Liferay 7.

    Portlet Controller Class

    Annotations in Spring MVC Portlet


    • @Controller

    When we use this annotation in the class The Spring Bean Container Considers the Class as a Portlet Controller which handles all the portlet requests comes to the portlet

    • @RequestMapping

    As we know there are different modes of portlet such as VIEW, EDIT and HELP, We can configure the portlet to handle the request only for a specific mode, in our case we are going to use the Portlet Controller only for handling requests in VIEW mode,  so it will be @RequestMapping("VIEW")

    • @ActionMapping

    In Liferay Portlet MVC we have processAction() method to handle the Action Requests comes to the portlet, similarly we can define Action Methods for Action URLs using this  Annotation

    • @RenderMapping

    We can use the @RenderMapping annotation to handle the Render Requests for Render URLs, We can Return the Page Name in the Render Methods, the returned page will be rendered in the portlet.

    • @ResourceMapping

    In Liferay Portlet MVC we have  serveResource() method to handle the Resource Requests, similarly  we can define Resource Methods for Resource URLs using this annotation with an id


    Web.xml

    web.xml is the root file for spring portlet, Spring Portlet Configurations starts from this file.

    portlet-application-context.xml

    View Resolver Configurations can be made in this file

    • contentType : view character encoding
    • prefix : view Files Path
    • suffix : view (File)Type
    • viewClass : View Resolver class for Markup language


  • Action URL Render URL And Resource URL In Liferay 7 DXP

    Action URL Render URL And Resource URL In Liferay 7 DXP

    Action URL Render URL And Resource URL In Liferay 7 DXP

    Action URL Render URL and the Resource URL are the most widely used words by the liferay developers as far as i know, lets see them one by one in detail in this blog.

    Environment
    Liferay IDE 3.1.1 GA2
    Liferay CE Portal Tomcat 7 GA4
    JDK 8
    MySql 5.7

    For creating Action or Render or resource url below portlet taglib should be defined in the JSP page.
    <%@ taglib uri="http://java.sun.com/portlet_2_0" prefix="portlet" %>
    <portlet:defineObjects />

    Action URL

    As we discussed in our earlier blog on portlet phases, using action url we can perform the operations such as add, update and delete the entities (Basically CRUD operations) or form submissions where the user is performing any kind of actions.

    <portlet:actionURL var="doActionVariable" name="doActionMethod"/>

    • var="doActionVariable" : Variable name of the action URL
    • name="doActionMethod" : action method name in the portlet controller class

    For this action URL to work properly there should an action method in the controller as shown below.

    public void doActionMethod(ActionRequest actionRequest, ActionResponse actionResponse) throws IOException, PortletException { System.out.println("doActionMethod Triggered"); }


    Render URL

    Render URL is used to render the jsp inside the portlet, when there are use cases where you just have to render a view or jsp in such use cases you can use the render method

    <portlet:renderURL var="renderJSPVariable">
    <portlet:param name="jspPage" value="/META-INF/resources/second.jsp"/>
    </portlet:renderURL>
    •  var="renderJSPVariable" : Variable name of the render URL
    •  name="jspPage": This parameter is used to specify the name of the jsp to render
    • value="/META-INF/resources/second.jsp" : the path of the jsp to render

    Resource URL

    Resource URL is used when you want perform any validation or Ajax request to accomplish any task on the server without reloading the page context.

    <portlet:resourceURL var="resourceVaraible" id="resourceId"/>
    •   var="resourceVaraible" : Variable name of the resource URL
    •   id="resourceId" : unique id for the serveresource mthod
    For this resource URL to work properly there should an action method in the controller as shown below.

    @Override public void serveResource(ResourceRequest resourceRequest, ResourceResponse resourceResponse) throws IOException, PortletException { String title = ParamUtil.getString(resourceRequest,"title"); if(title.equalsIgnoreCase("Liferaystack")){ System.out.println("Enetered Title is LiferayStack "); resourceResponse.getWriter().print("true"); }else{ System.out.println("Enetered Title is NOT LiferayStack "); resourceResponse.getWriter().print("false"); } }

    Lets Bind the view and controller code into a portlet, i have created a portlet with a Portlet Controller Class and Two JSPs, view.jsp and second.jsp for the demo of Action URL, Render URL and Resource URL, Just Download, deploy and test the URLs.

    Source Code


  • Pre Login and Post Login Action In Liferay 7 DXP

    Pre Login and Post Login Action In Liferay 7 DXP

    Pre Login and Post Login Action In Liferay 7 DXP

    In order to create a Pre Login Action in liferay, create an Activator Module Project with the Project Template of "activator", after creating the Module Right Click on the module to create a component class as shown in the below image.


    Select the "Login Pre Action" component class template and give a component class name as shown in the image.


    After creating the component you will be able to see the LoginPreAction Class.


    Post Login Action
    For Post Login Action the property key will be "key=login.events.post"


    buil.gradle

    dependencies { compileOnly group: "org.osgi", name: "org.osgi.core", version: "6.0.0" compile group: "org.osgi", name:"org.osgi.service.component.annotations", version:"1.3.0" compileOnly group: "com.liferay.portal", name: "com.liferay.portal.kernel", version: "2.0.0" compileOnly group: "javax.servlet", name: "javax.servlet-api", version: "3.0.1" compileOnly group: "javax.portlet", name: "portlet-api", version: "2.0" compileOnly group: "com.liferay.portal", name: "com.liferay.util.taglib", version: "2.0.0" compileOnly group: "jstl", name: "jstl", version: "1.2" compileOnly group: "org.osgi", name: "osgi.cmpn", version: "6.0.0" }

    Source Code


  • Search Container In Liferay

    Search Container In Liferay

    Search Container is an utility by Liferay for showing the data from table(s) in structured way with many features such pagination of items, searching, sorting and many more.


    <%@page import="java.util.List"%> <%@page import="com.liferay.portal.kernel.model.User"%> <%@page import="com.liferay.portal.kernel.util.ListUtil"%> <%@page import="com.liferay.portal.kernel.service.UserLocalServiceUtil"%> <%@ taglib uri="http://liferay.com/tld/ui" prefix="liferay-ui" %> <% List<User> users = UserLocalServiceUtil.getUsers(-1,-1); System.out.println(users.size()); %> <liferay-ui:search-container total="<%=users.size()%>" var="searchContainer" delta="1" deltaConfigurable="true" emptyResultsMessage="Oops. There Are No Users To Display, Please add Users"> <liferay-ui:search-container-results results="<%=ListUtil.subList(users, searchContainer.getStart(),searchContainer.getEnd())%>" /> <liferay-ui:search-container-row className="com.liferay.portal.kernel.model.User" modelVar="user" keyProperty="userId" > <liferay-ui:search-container-column-text name="User Id" value="${user.userId}"/> <liferay-ui:search-container-column-text name="firstName" property="firstName"/> <liferay-ui:search-container-column-text name="lastName" property="lastName"/> <liferay-ui:search-container-column-text name="Email" value="${user.emailAddress}"/> </liferay-ui:search-container-row> <liferay-ui:search-iterator /> </liferay-ui:search-container>

    Above search Container have minimal tags just to show you the demonstration of it. lets see the different tags used in the search container one by one.

    < liferay-ui:search-container>

    This is the main tag used to declare the search container.
    total : total number of items available in the table.
    delta : items per page
    deltaConfigurable : Flag to allow user to change the item per page from UI
    emptyResultsMessage : Message To Display when there are no items

    < liferay-ui:search-container-results>

    Using this tag we can iterate through the list of items.
    result : A variable to hold result

    < liferay-ui:search-container-row>


  • Portlet Lifecycle In Liferay

    Portlet Lifecycle In Liferay

    Portlet Lifecycle In Liferay

    In This Blog Lets see how a Portlet's Life cycle is managed by a portlet container from its initialization to destroy.portlet have similar lifecycle as that of a servlet, portlet needs a portlet container similar to a servlet, we know that  servlet have lifecycle of init(), service() and destroy() similarly liferay's lifecycle have the following stages.

    1. init()  
    This is the first method which will be triggered when we deploy the portlet in portlet container such as tomcat, jboss or any portlet container. This method will be called only during the deployment of the portlet.

    2. render()
    Once you deploy the portlet and add the portlet to your page render() method will be called, this method will process the configured jsp and returns the html content to the portlet.

    3. processAction()
    processAction method will be called when we use Action URL in our portlet, usually it is used for form submitting CRUD actions.


    4. processEvent()
    processEvent method is part of the JSR 286 portlet specification standards, this method is aimed to execute when an event is raised by another portlet via Inter Portlet Communication (IPC) mechanism.

    5. serveResource()
    serveResource method is also part of the JSR 286 portlet specification standards, it will be executed and used for AJAX request handling, we can call this method by creating a Liferay resource URL


    6. destroy()
    This is the last method which will be executed when the portlet is undeployed from the portlet container, when this method gets executed we can conclude that the portlet is removed from the portlet container


  • Portlet Phases In Liferay

    Portlet Phases In Liferay

    Portlet Phases In Liferay

    Liferay is implemented on Java Portlet specification such as JSR 168, JSR286 till now and the latest Java Portlet specification of JSR 362 are expected to arrive on the future versions of Liferay,

    Lets see the different phases supported in Liferay till JSR 286, not to be confused with the lifecycle of Portlet, which i will be covering in the future blogs.

    Action Phase 
    When we want to perform any action such as add,update or delete (CRUD) operations we can make use of this action phase

    Render Phase 
    When we want to just render a JSP in our Portlet We can use this phase, this phase will just render the JSP in the portlet

    Resource Phase 
    Resource Phase provides a way to perform some tasks without reloading the page context, basically it can be used for AJAX request handling, some of the use cases such as front end validations of input fields etc.


  • Creating Liferay Theme In Liferay 7 DXP

    Creating Liferay Theme In Liferay 7 DXP

    Creating Liferay Theme In Liferay 7 DXP

    For Creating new liferay theme in Liferay 7 or DXP We must have a LiferayWorkspace as usual if you are using gradle as build tool, If you are using Maven then the creation steps are different

    Environment
    Liferay IDE 3.1.1 GA2
    Liferay CE Portal Tomcat 7 GA4
    JDK 8
    MySql 5.7

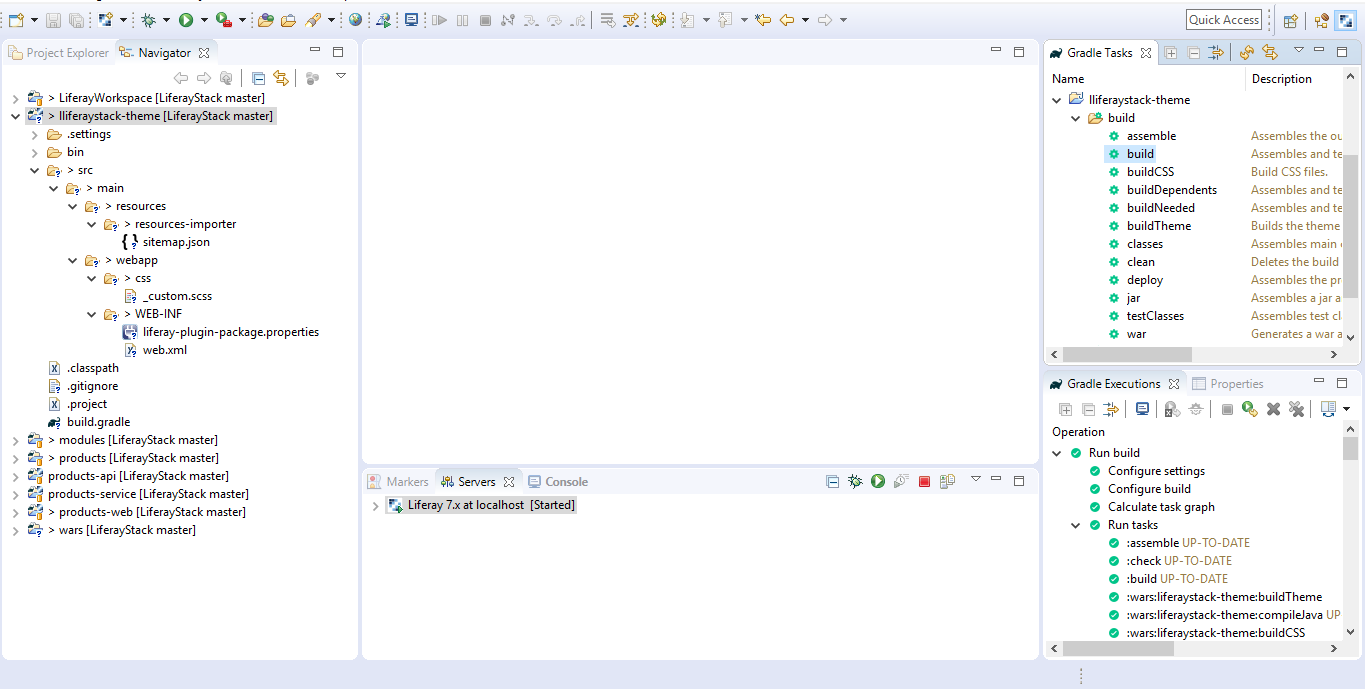
    Lets create the theme by creating a Module Project using 'New Liferay Module Project' Option menu in the IDE, Give the Project Name for your theme, build type as Gradle and Project Template Name as theme as shown in the below image


    Click Finish. A New Liferay Theme Stracture Will Be Created As Shown In The Below Image.


    From The Gradle Task Panel Execute The 'build' Task By Double Clicking The build Option, Once The build Is Successful Refresh The Module Project. You Can See The Newly Generated Files Such As css, images, js, templates And liferay-look-and-feel.xml Files As Shown In The Below Image


    If you want to modify any css, js, images or template files just copy them to the 'src' folder and modify as per your needs. If you want to change any markup language from ftl to vm you can modify them in liferay-look-and-feel.xml file.

    Content Contribution By Zia